Growing a thriving garden is rewarding, but the real challenge is using its produce well. As your hard work grows ripe, knowing how to keep its flavor and nutrients is key.
Using garden preservation techniques helps you enjoy your garden’s fruits all year. Learning to preserve your garden’s produce lets you taste summer’s sweetness even in winter.
Whether you’re an experienced gardener or new to it, knowing how to get the most from your garden is vital. This guide will show you the best ways to harvest and preserve your garden’s bounty. You’ll learn to make the most of your hard work.
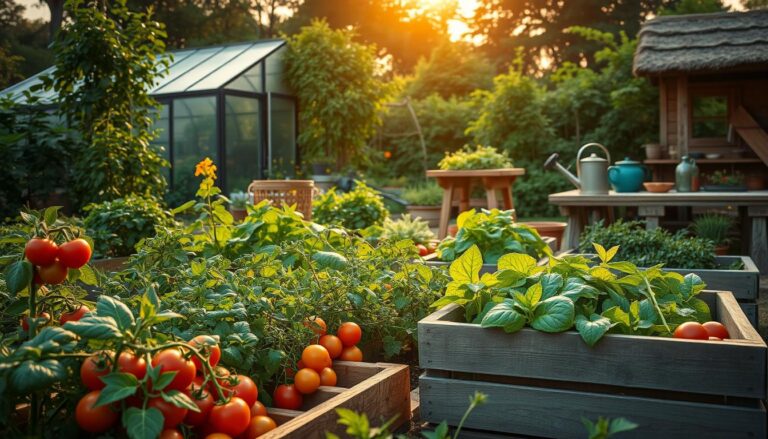
The Joy of Garden-to-Table Living
Garden-to-table living is more than just food. It’s about the joy of growing your garden and enjoying what you grow. This way of living has many benefits, like saving money and eating healthier.
Economic Benefits of Home Preservation
Preserving your own food can cut down your grocery bills. Having a stash of preserved foods means you don’t have to buy expensive store-bought items.
Reducing Grocery Bills Through Self-Sufficiency
By growing and preserving your own food, you become more independent. As one gardener said, “Preserving my own produce has not only saved me money but also given me a sense of pride and accomplishment.”
Minimizing Food Waste from Your Garden
Preserving your garden’s harvest helps reduce waste. Techniques like canning, freezing, or dehydrating let you enjoy your food all year without wasting any.
Nutritional Advantages of Preserved Garden Produce
Proper preservation keeps the vitamins and minerals in your food. This means you can have healthy meals even when the season changes.
Retaining Vitamins and Minerals Through Proper Preservation
Methods like water bath canning or freezing help keep your food nutritious. As
“The key to maintaining the nutritional value of preserved foods is to use proper techniques and equipment.”
Planning for Harvesting and Preserving Your Garden Bounty
To get the most from your garden, planning is key. You need to think about harvesting and preserving your crops. Good planning helps you get more from your garden and enjoy it all year.
Succession Planting for Continuous Harvests
Succession planting means planting small amounts of seeds often. This method gives you a steady flow of produce. It also helps avoid having too much to handle at once.
Staggering Preservation Projects Throughout the Season
Staggering your preservation tasks helps you stay organized. For instance, can vegetables in summer and freeze fruits in late summer or early fall. This way, you can enjoy a variety of foods all year.
| Preservation Method | Season | Best For |
|---|---|---|
| Canning | Summer | Vegetables, Fruits |
| Freezing | Late Summer, Early Fall | Fruits, Vegetables |
| Dehydrating | Year-Round | Herbs, Fruits, Vegetables |
Record-Keeping for Future Garden Planning
Keeping detailed records is crucial for future planning. It helps you track what works and what doesn’t. This way, you can improve your garden year after year.
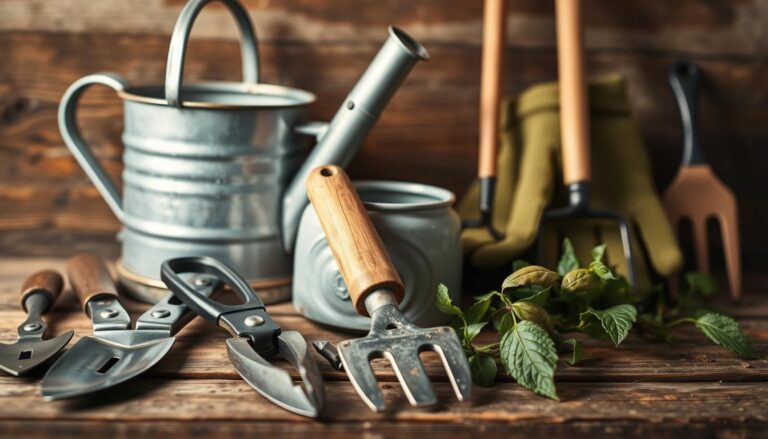
Essential Tools for the Harvest-to-Preservation Process
The right tools make harvesting and preserving your garden’s bounty easier. You need the right tools to handle your garden’s produce well.
Harvesting Equipment Every Gardener Needs
Harvesting your garden’s produce needs specific tools for different plants. Cutting tools are key for this.
Cutting Tools for Different Plant Types
Each plant needs its own cutting tool. For example, sharp pruning shears work best for herbs and leafy greens. A serrated knife is better for thicker stalks.
- Pruning shears for delicate herbs and greens
- Serrated knives for thicker produce
- Gardening scissors for precision cutting
Containers for Collection and Transport
After harvesting, you need the right containers to keep your produce fresh. Reusable baskets and breathable bags are great for this.
Preservation Tools and Supplies
Preserving your garden’s bounty needs specific tools. The right tools can greatly improve the quality of your stored produce.
Canners, Dehydrators, and Storage Containers
For long-term storage, use water bath canners for high-acid foods, pressure canners for low-acid foods, and dehydrators for drying. Air-tight storage containers also help keep things fresh.
| Tool/Supply | Use | Benefit |
|---|---|---|
| Water Bath Canner | Preserving high-acid foods | Safe and effective method for jams, jellies, and pickles |
| Pressure Canner | Preserving low-acid foods | Ensures safety by killing off bacteria and spores |
| Dehydrator | Drying fruits, vegetables, and herbs | Preserves nutrients and flavor, reduces storage space |
Safety Equipment for Food Preservation
When preserving food, safety is crucial. You need canning jars and lids, canner racks, and gloves for handling hot jars and equipment.
Timing Your Harvest for Maximum Flavor and Nutrition
The timing of your harvest greatly affects the quality and taste of your homegrown produce. Knowing when to pick your vegetables and fruits is key to enjoying them at their best.
Signs of Readiness for Common Vegetables
Different vegetables show readiness in unique ways. For example, leafy greens are ready when they reach their full color and are still tender. Tomatoes are best when they are fully colored and slightly soft to the touch.
Visual Indicators of Peak Ripeness
Visual cues are crucial for knowing when vegetables are ready. For instance, carrots are ready when their tops start to show above the soil. Broccoli is ready when its buds are tight and green.
| Vegetable | Signs of Readiness |
|---|---|
| Leafy Greens | Full color, tender |
| Tomatoes | Fully colored, slightly soft |
| Carrots | Top protruding from soil |
Optimal Harvesting Times for Fruits
Fruits also have the best times to harvest. For many fruits, the best time is early in the morning. This is after the dew has dried but before the day gets hot.
Regional Considerations for US Growing Zones
The best time to harvest can change based on where you are in the US. For example, in warmer zones like Zone 10, fruits may be ready sooner than in cooler zones like Zone 4.
The Best Time of Day to Harvest
Harvesting in the cooler part of the day, usually early morning, helps keep your produce fresh. It minimizes water loss and reduces damage from heat.
Proper Harvesting Techniques for Different Plant Types
Knowing how to harvest your garden’s produce is key. Each plant type has its own needs for harvesting. This ensures they stay flavorful, fresh, and full of nutrients.
Harvesting Leafy Greens and Herbs
Leafy greens and herbs are simple to harvest. The way you harvest them can affect how much they grow back.
Cut-and-Come-Again Methods
For greens like lettuce and spinach, a cut-and-come-again method works well. It lets the plant grow back, giving you more harvests from one planting.
Root Vegetable Harvesting Methods
Root veggies, like carrots and beets, need careful harvesting. This prevents damage.
Tools and Techniques to Prevent Damage
Using the right tools, like a fork, helps avoid bruising. This keeps your root veggies in great shape for saving.
Fruit and Seed Vegetable Harvesting
Fruits and seed veggies, like tomatoes and squash, have their own harvesting needs.
Supporting Heavy Plants During Harvest
Heavy fruits need support during harvest. This prevents branch breakage and keeps the plant healthy, ensuring more growth.
By using these harvesting methods for different plants, gardeners can enjoy a rich harvest. They can also preserve their garden’s produce well.
Post-Harvest Handling to Extend Shelf Life
What you do right after picking can really help your garden food last longer. Taking the right steps ensures your fruits and veggies stay fresh and full of nutrients.
Cleaning and Sorting Your Harvest
Start by cleaning your picked produce to get rid of dirt or debris. It’s also key to sort your harvest. This helps you spot and set aside any bad or spoiled items that could ruin the rest.
Sorting Criteria:
- Remove any produce with visible signs of damage or decay
- Separate produce by type and maturity
- Handle produce gently to avoid bruising
Curing Techniques for Storage Crops
Curing is vital for some storage crops. It makes them last longer and stay fresh. This step involves drying the surface to stop moisture from causing rot or mold.
Onions, Garlic, and Winter Squash
For onions and garlic, curing means drying them in a warm, well-ventilated spot. Winter squash also needs a curing period, usually in a warm, dry place.
Preventing Spoilage Before Preservation
It’s important to control temperature and humidity to stop spoilage before you can preserve your harvest.
Temperature and Humidity Control
Most produce does best in cool, humid conditions. The best storage conditions vary by type. But generally, a temperature between 32°F and 50°F and humidity between 80% and 90% is recommended.
| Produce Type | Ideal Temperature (°F) | Ideal Humidity (%) |
|---|---|---|
| Root Vegetables | 32-40 | 90-95 |
| Leafy Greens | 32-40 | 95-100 |
| Fruits | 40-50 | 80-90 |
Water Bath Canning: Preserving High-Acid Foods
Water bath canning is a great way to keep the taste of your garden all year. It’s perfect for foods like fruits, pickles, and jams. These foods are naturally acidic or have acid added, making them great for canning.
Equipment and Safety Essentials
Before you start, make sure you have the right tools and follow safety rules. You’ll need a big pot (canner), a rack, clean jars, lids, bands, and a jar lifter.
USDA Guidelines for Safe Canning
The USDA has detailed guidelines for safe canning. These include using tested recipes, keeping the right acidity levels, and following processing times. Always follow these guidelines to avoid spoilage and foodborne illness.
- Use a tested recipe from a reliable source.
- Ensure your jars and lids are sterilized before filling.
- Leave the recommended headspace to allow for expansion.
Step-by-Step Water Bath Canning Process
The water bath canning process has several steps. First, prepare your high-acid foods as your recipe says. Then, fill your jars, leaving the right headspace. Next, put the lids and bands on, and process the jars in boiling water for the right time.
Headspace, Processing Times, and Cooling
Headspace is key for expansion during processing. Processing times depend on the food, altitude, and jar size. After processing, take the jars out of the water and cool them on a wire rack for 12 to 24 hours.
“The art of canning is not just about preserving food; it’s about capturing the essence of the season to enjoy later.”
Best Vegetables and Fruits for Water Bath Canning
High-acid foods are best for water bath canning. This includes many fruits and pickled vegetables.
Tomatoes, Pickles, Jams, and Fruit Preserves
Tomatoes and pickles are favorites, as are jams and fruit preserves. These foods are naturally acidic or have acid added, making them perfect for canning. There are many recipes to try, offering a variety of flavors all year.
- Prepare your canning area and equipment.
- Follow a tested recipe for your chosen food.
- Process your jars in a boiling water bath.
- Let the jars cool, then store them in a cool, dark place.
Pressure Canning for Low-Acid Vegetables
To enjoy your garden’s bounty all year, you need to learn pressure canning for low-acid veggies. This method keeps beans, corn, and peas safe and full of nutrients and taste.
Understanding Pressure Canner Safety
Pressure canning is safe for low-acid foods, but you must follow safety rules. “The key to safe pressure canning lies in understanding how to prevent botulism and other foodborne illnesses,” says it’s all about the right technique.
Preventing Botulism and Other Foodborne Illnesses
Botulism is a big risk with low-acid foods. Make sure your pressure canner works well and use tested recipes. Always check the canner’s gauge before you start.
Detailed Pressure Canning Instructions
To can low-acid veggies, use a tested recipe and follow the steps. First, prepare your veggies as the recipe says. Then, pack them into clean, sterilized jars, leaving the right amount of space.
Adjusting for Altitude in Different US Regions
Altitude changes how you pressure can. If you live high up, adjust your canner’s pressure. Check a reliable canning guide or the USDA’s Complete Guide to Home Canning for altitude tips.
Vegetables That Require Pressure Canning
Low-acid veggies like beans, corn, and peas need pressure canning. They can get contaminated by Clostridium botulinum spores. These spores are killed by the high heat of pressure canning.
Beans, Corn, and Other Low-Acid Produce
Beans and corn are low-acid and need pressure canning. Use tested recipes and always pressure can to reach safe temperatures.
By following these tips and knowing the importance of pressure canning for low-acid veggies, you can enjoy your garden’s harvest all year. It’s safe and tasty.
Freezing Your Garden’s Bounty: Quick and Easy Preservation
Freezing is a fast and simple way to keep your garden’s harvest fresh. It lets you enjoy your homegrown food all year without losing much flavor or nutrients.
Blanching Techniques for Freezing Vegetables
Blanching is key before freezing veggies to stop spoilage and keep color and texture. Blanching means briefly boiling or steaming veggies and then cooling them fast in ice water.
Packaging Methods to Prevent Freezer Burn
It’s important to package frozen veggies right to avoid freezer burn. Use airtight containers or freezer bags to keep your frozen food fresh.
Organizing Your Freezer for Maximum Efficiency
Keeping your freezer organized is vital for using space well and accessing your frozen food easily. Use an inventory system to track what you have stored.
Inventory Systems for Frozen Produce
Keeping an inventory of your frozen food is easy. Just write it down on your fridge or use a phone app. This way, you use the oldest items first and cut down on waste.
Dehydrating Fruits, Vegetables, and Herbs
Dehydrating is a great way to keep your garden’s flavors and nutrients alive. It removes water, letting you enjoy your harvest all year.
Dehydrator vs. Oven Methods
You can dehydrate with a dehydrator or your oven. Dehydrators control temperature well, perfect for delicate items. Ovens are cheaper but need more care to avoid over-drying.
Energy Efficiency Considerations
Think about energy use when choosing. Dehydrators use less power for drying. Ovens use more, especially for long times.
Preparation Steps for Successful Dehydration
Good prep is essential for great results. This means slicing produce right and using pre-treatments to stop browning.
Slicing Thickness and Pre-Treatments
Slice thickness affects drying time and quality. Thinner slices dry quicker but can break easily. Pre-treatments like blanching or lemon juice can improve color and texture.
Storage Solutions for Dehydrated Foods
Proper storage is key for keeping dehydrated foods fresh. Use air-tight containers or vacuum-sealed bags to block moisture.
Vacuum Sealing and Moisture Absorbers
Vacuum sealing extends shelf life by removing air. Moisture absorbers in containers also help keep things dry.
Fermentation and Pickling: Traditional Preservation Methods
Discover how to make the most of your garden with fermentation and pickling. These old methods keep your harvest fresh longer. They also make your food taste better and more nutritious.
Quick Pickling Techniques
Quick pickling is easy and quick. You soak sliced or whole veggies in vinegar-based brine for just a day. It’s perfect for harvesting and preserving your garden bounty when it’s in season.
Refrigerator Pickles and Quick Relishes
Refrigerator pickles let you enjoy your garden without canning. Just make a brine, add veggies, and chill them. Quick relishes are similar, using veggies and spices for a tangy flavor.
Lacto-Fermentation Basics
Lacto-fermentation lets veggies ferment in their own juices. This makes lactic acid and preserves them. It’s great for garden bounty storage methods and boosts the veggies’ nutritional value.
Sauerkraut, Kimchi, and Fermented Vegetables
Sauerkraut and kimchi are famous lacto-fermented foods. To make sauerkraut, just shred cabbage, add salt, and let it ferment. Kimchi is similar but with more veggies and spices. Carrots and cucumbers can also be fermented this way.
Equipment and Ingredients for Successful Fermentation
To ferment or pickle your garden produce well, you need the right tools and ingredients. This includes crocks, weights, and airlocks for the perfect fermentation environment.
Crocks, Weights, and Airlocks
Crocks hold the veggies during fermentation. Weights keep them under their juices to prevent spoilage. Airlocks let carbon dioxide out while keeping air and bacteria in.
By using fermentation and pickling, you can enjoy your garden all year. You’ll get to relish the tastes and health benefits of your harvest.
Conclusion: Enjoying Your Garden’s Bounty Year-Round
By using the garden harvesting tips and preserving methods, you can enjoy your garden all year. Techniques like water bath canning, pressure canning, freezing, dehydrating, and fermentation help a lot. These methods ensure your harvest stays fresh and tasty.
Preserving your produce well keeps its nutrients and flavor. Learning these techniques lets you enjoy your garden’s fruits and veggies even when they’re not in season. This way, you get to enjoy the fruits of your labor all year long.
Whether you’re new to gardening or have been doing it for years, you can still enjoy the benefits. With the right tools and knowledge, you can have a steady supply of fresh, healthy food. Every meal becomes a celebration of your garden’s bounty.
FAQ
What are the best methods for preserving garden produce?
How do I know when my vegetables are ready to harvest?
What is the importance of blanching before freezing vegetables?
How can I prevent freezer burn when freezing my garden’s bounty?
What are the safety considerations for pressure canning low-acid vegetables?
Can I dehydrate fruits and vegetables without a dehydrator?
How do I store dehydrated foods to maintain their quality?
What is the benefit of succession planting for preserving garden produce?
How do I determine the correct processing time for water bath canning?

Sortemdia nasceu com o propósito de trazer alegria e oportunidades para todos por meio de sorteios gratuitos de prêmios incríveis. O site tem como missão oferecer experiências acessíveis, divertidas e justas para quem deseja concorrer a produtos, serviços e brindes sem pagar nada por isso. Acreditamos que a sorte pode bater à porta de qualquer pessoa — e no Sortemdia, ela pode chegar com apenas um clique.